Merchant Reporting
Steps to develop reports and participate in a range of report-related activities.
Add new Charge Reports
To request a new Charge report:
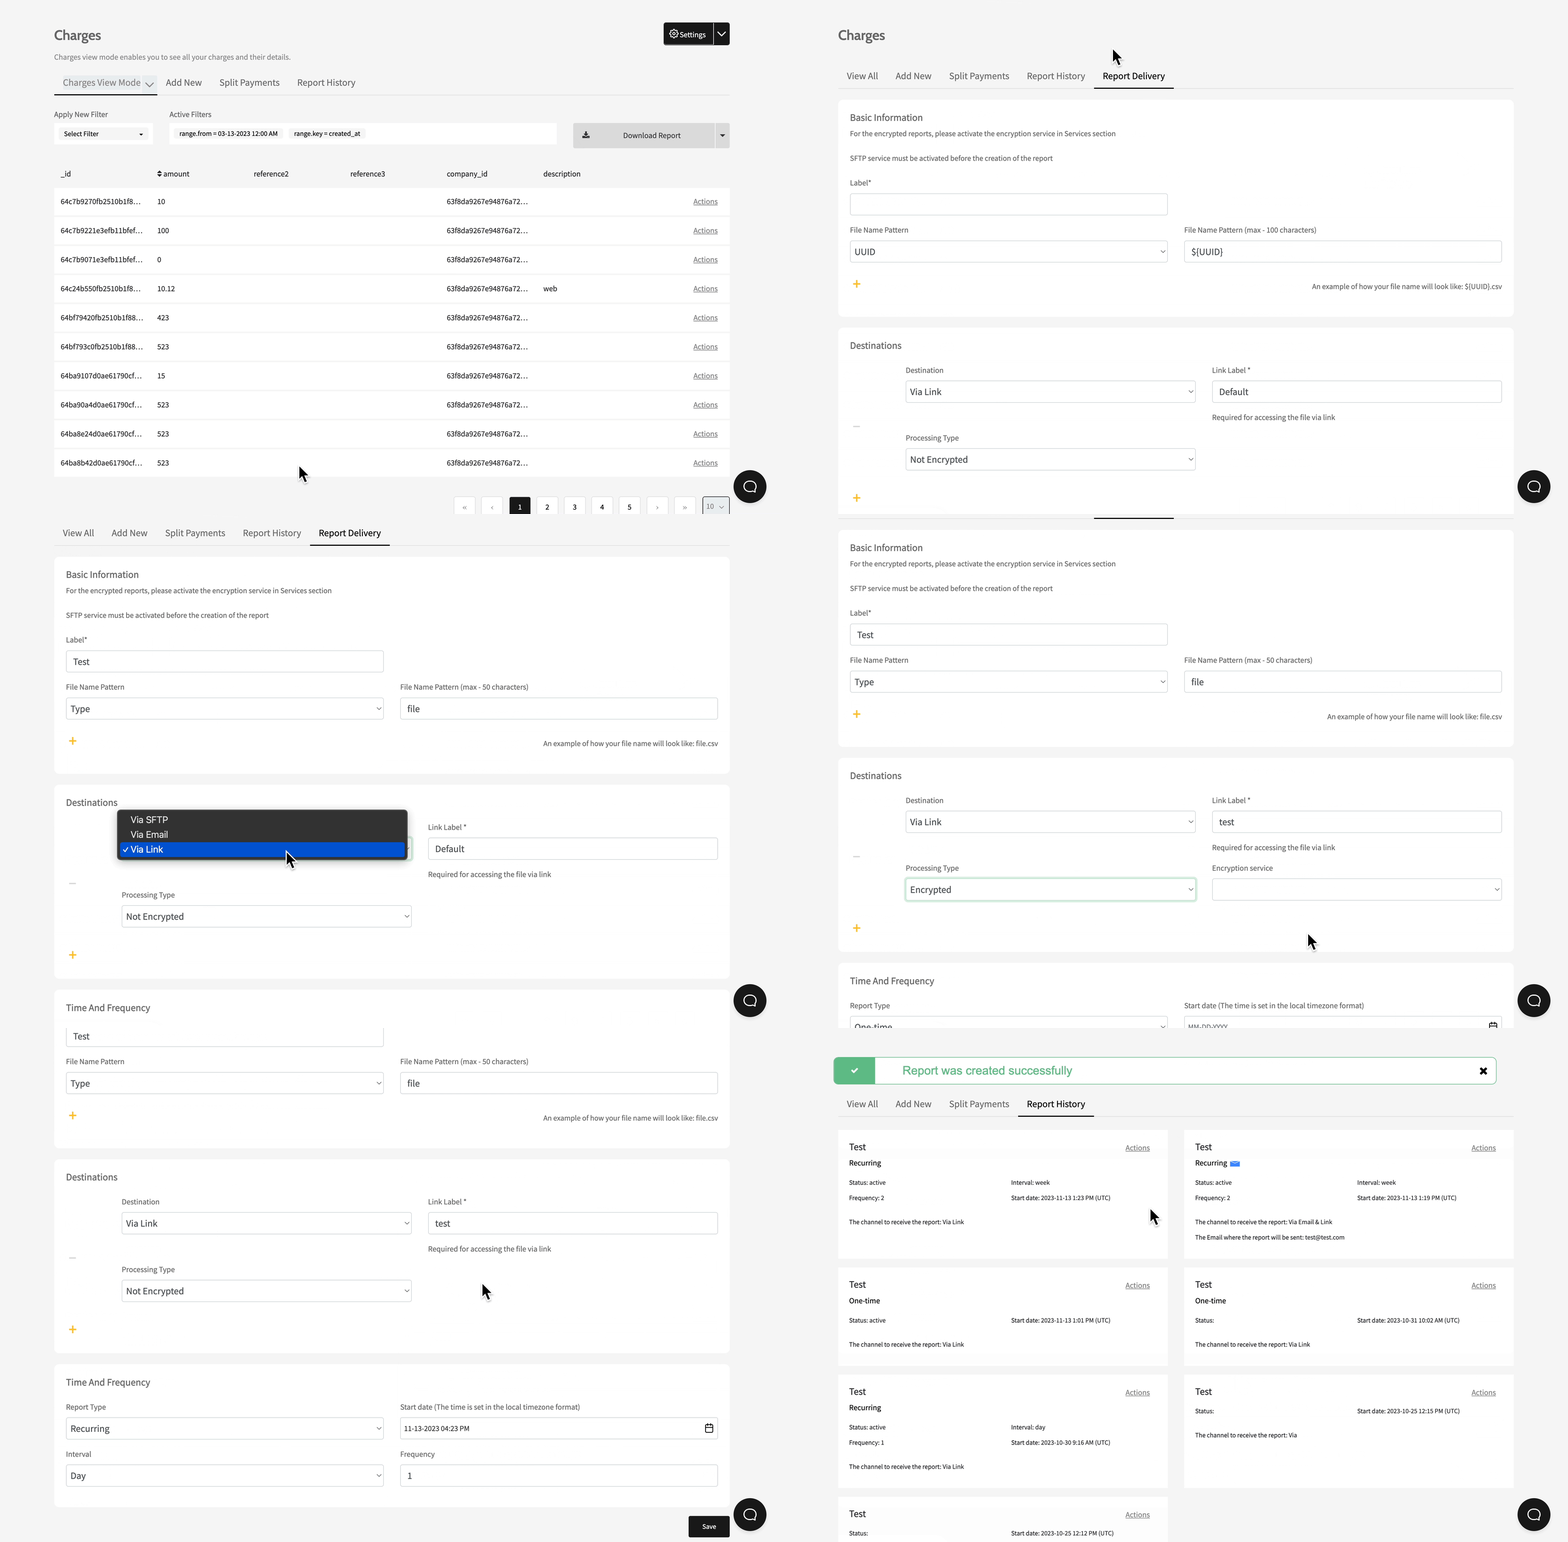
- Go to Charges > View Mode.
- Choose a ready template from the arrow next to Settings in the upper right corner. Or add a new template here .
- Click Download Report > Request report from the drop-down menu.
- The Report Delivery tab will be opened. Fill in the report settings:
- Label - the report's name.
- File Name Pattern - the type of the pattern for file naming.
- Destination - the report's receiving channel (email or SFTP). Insert the email address or choose the SFTP destination from the drop-down menu.
- Processing Type - encrypted or non-encrypted file. If you'd like to encrypt the file, you can choose your encryption service from the drop-down menu.
- Report Type - the types of the reports: One-Time or Recurring. If Recurring choose Interval and Frequency.
- Start Date - the report's start date.
- Press Save.
To add a new SFTP service, go here. To add Encryption service, go here.
Note : Paydock's dashboard has a constraint on report generation, allowing for a maximum of 20 reports to be generated simultaneously. This limitation is applicable across all companies, brands, and at a global level.
Edit Charge reports
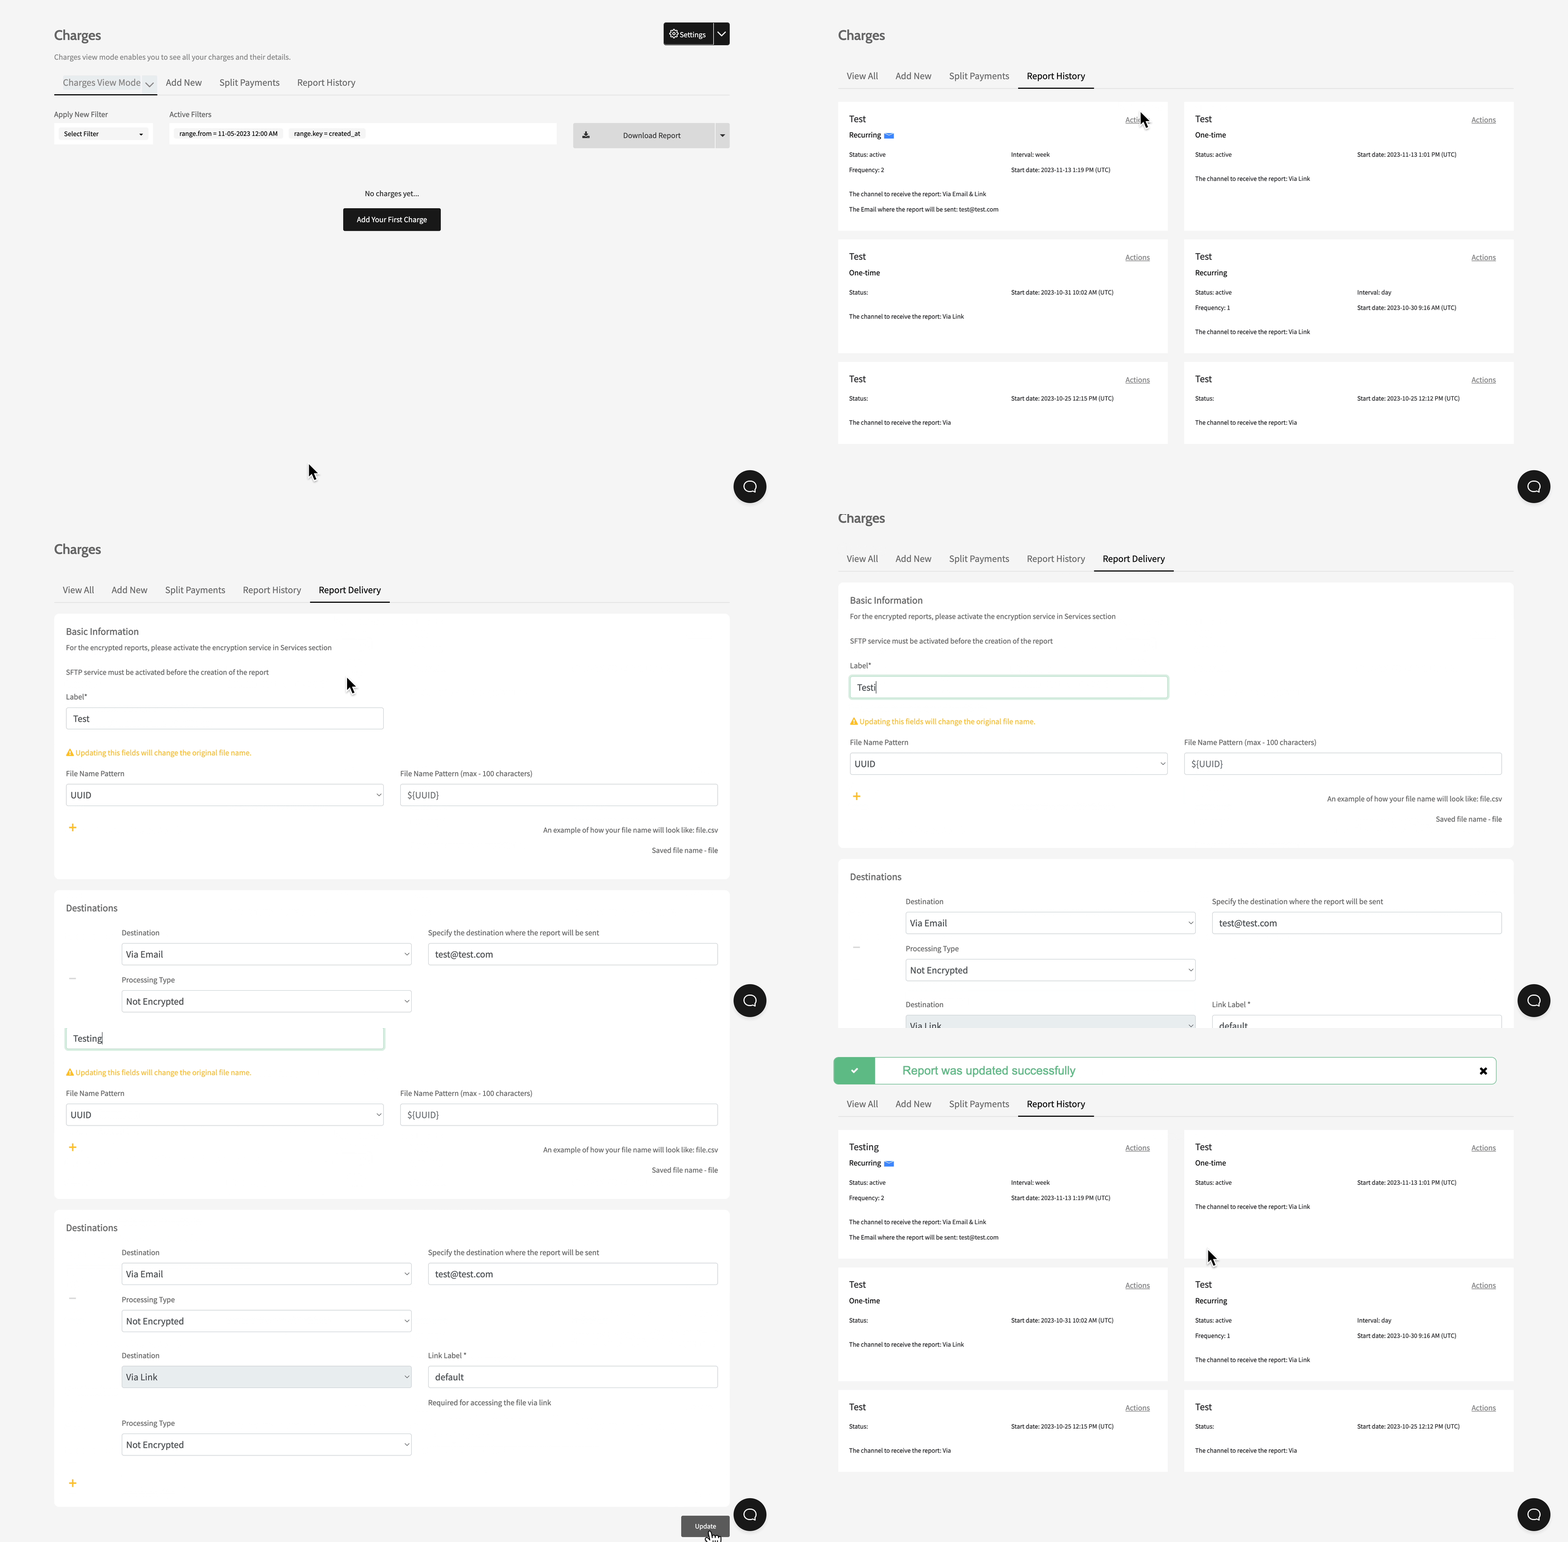
To edit a recurring Charge report:
- Go to Charges> Report History > Actions > Edit report for the specified recurring report.
- Click Update.
Remove Charge Reports
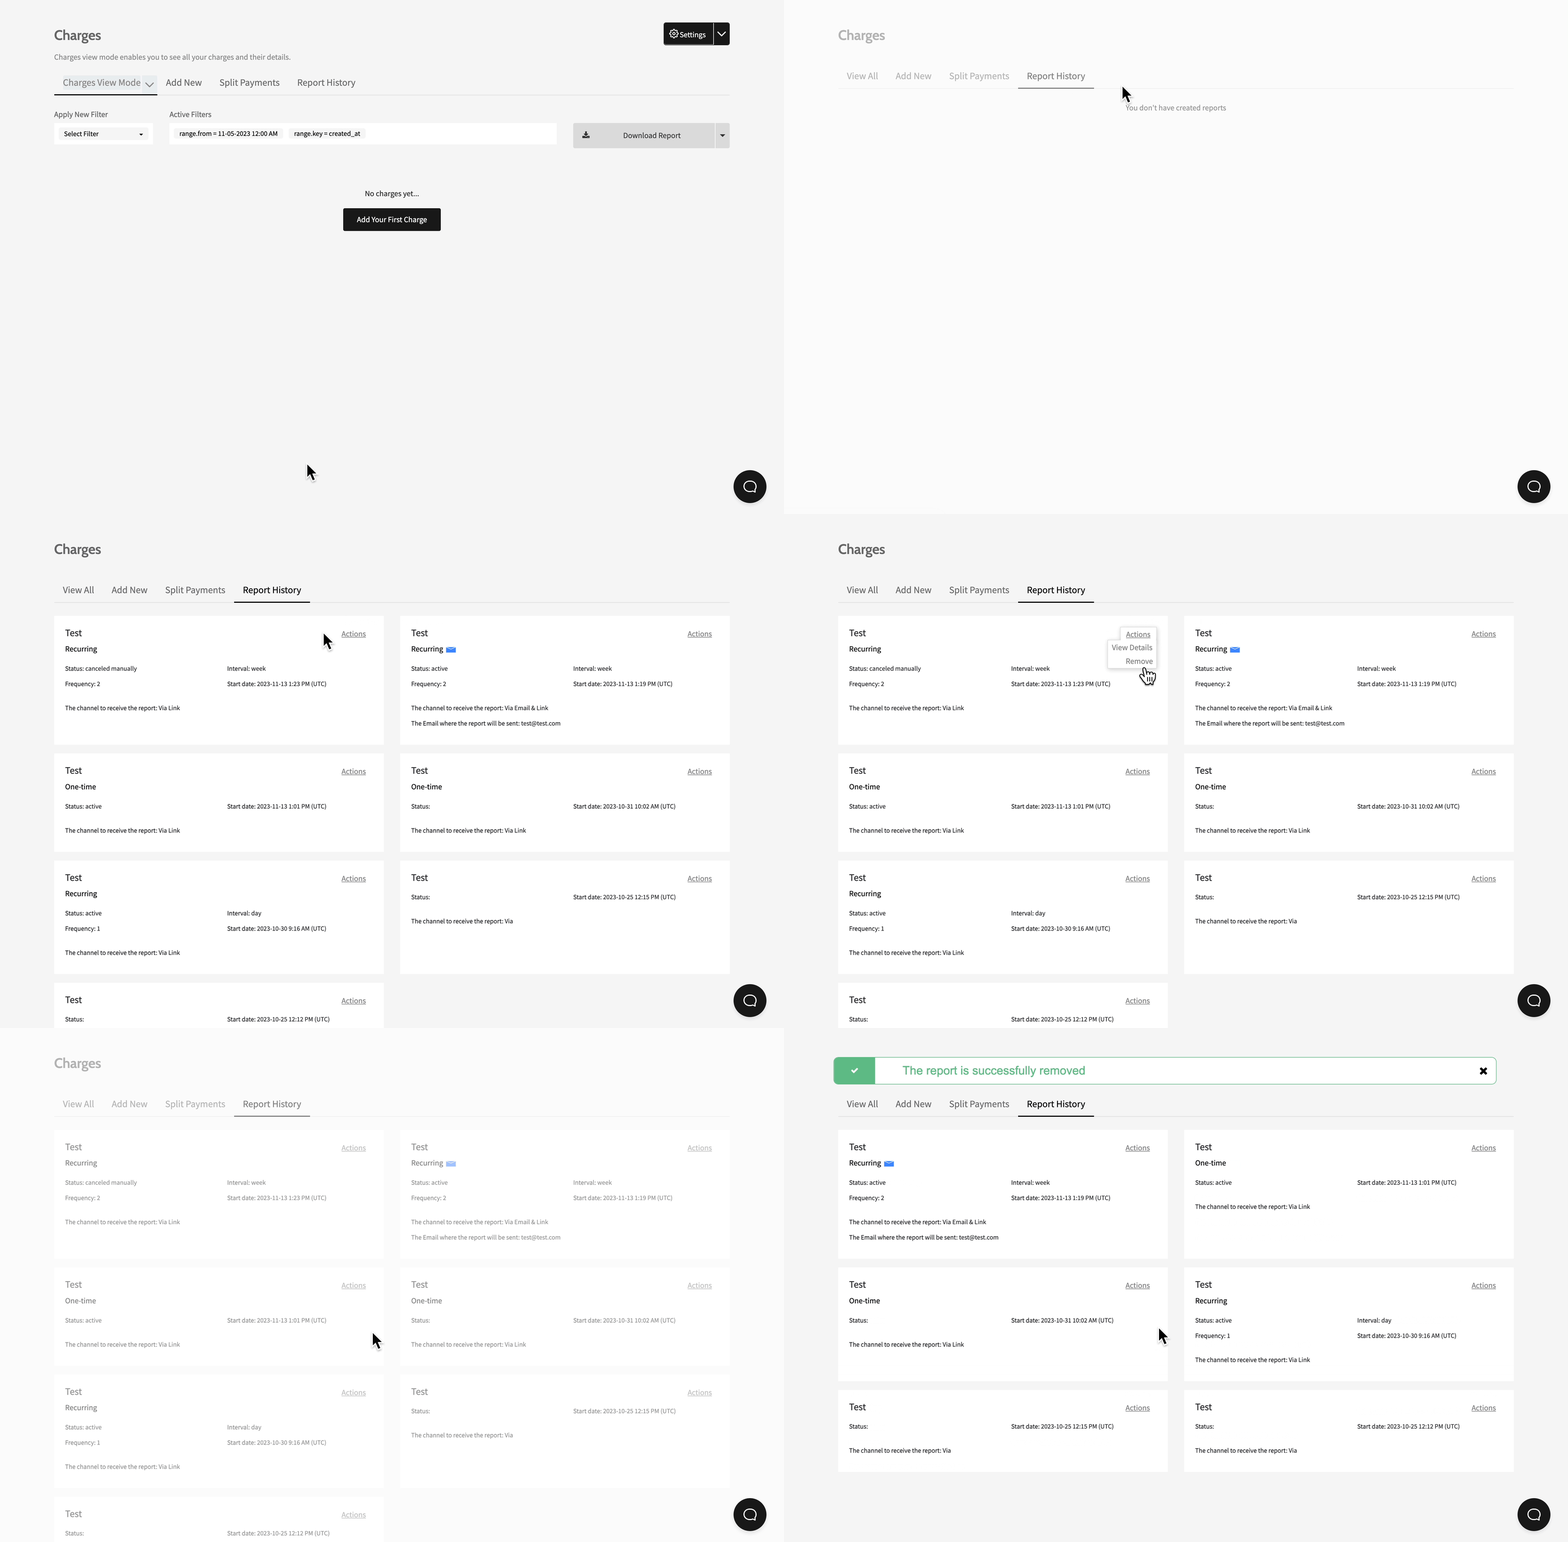
To remove a Charge report:
- Go to Charges > Report History > Actions > Remove for the specified report.
- Click Confirm.
View Charge Reports details
To view a Charge report's details:
- Go to Charges > Report History > Actions > View Details for the specified report.
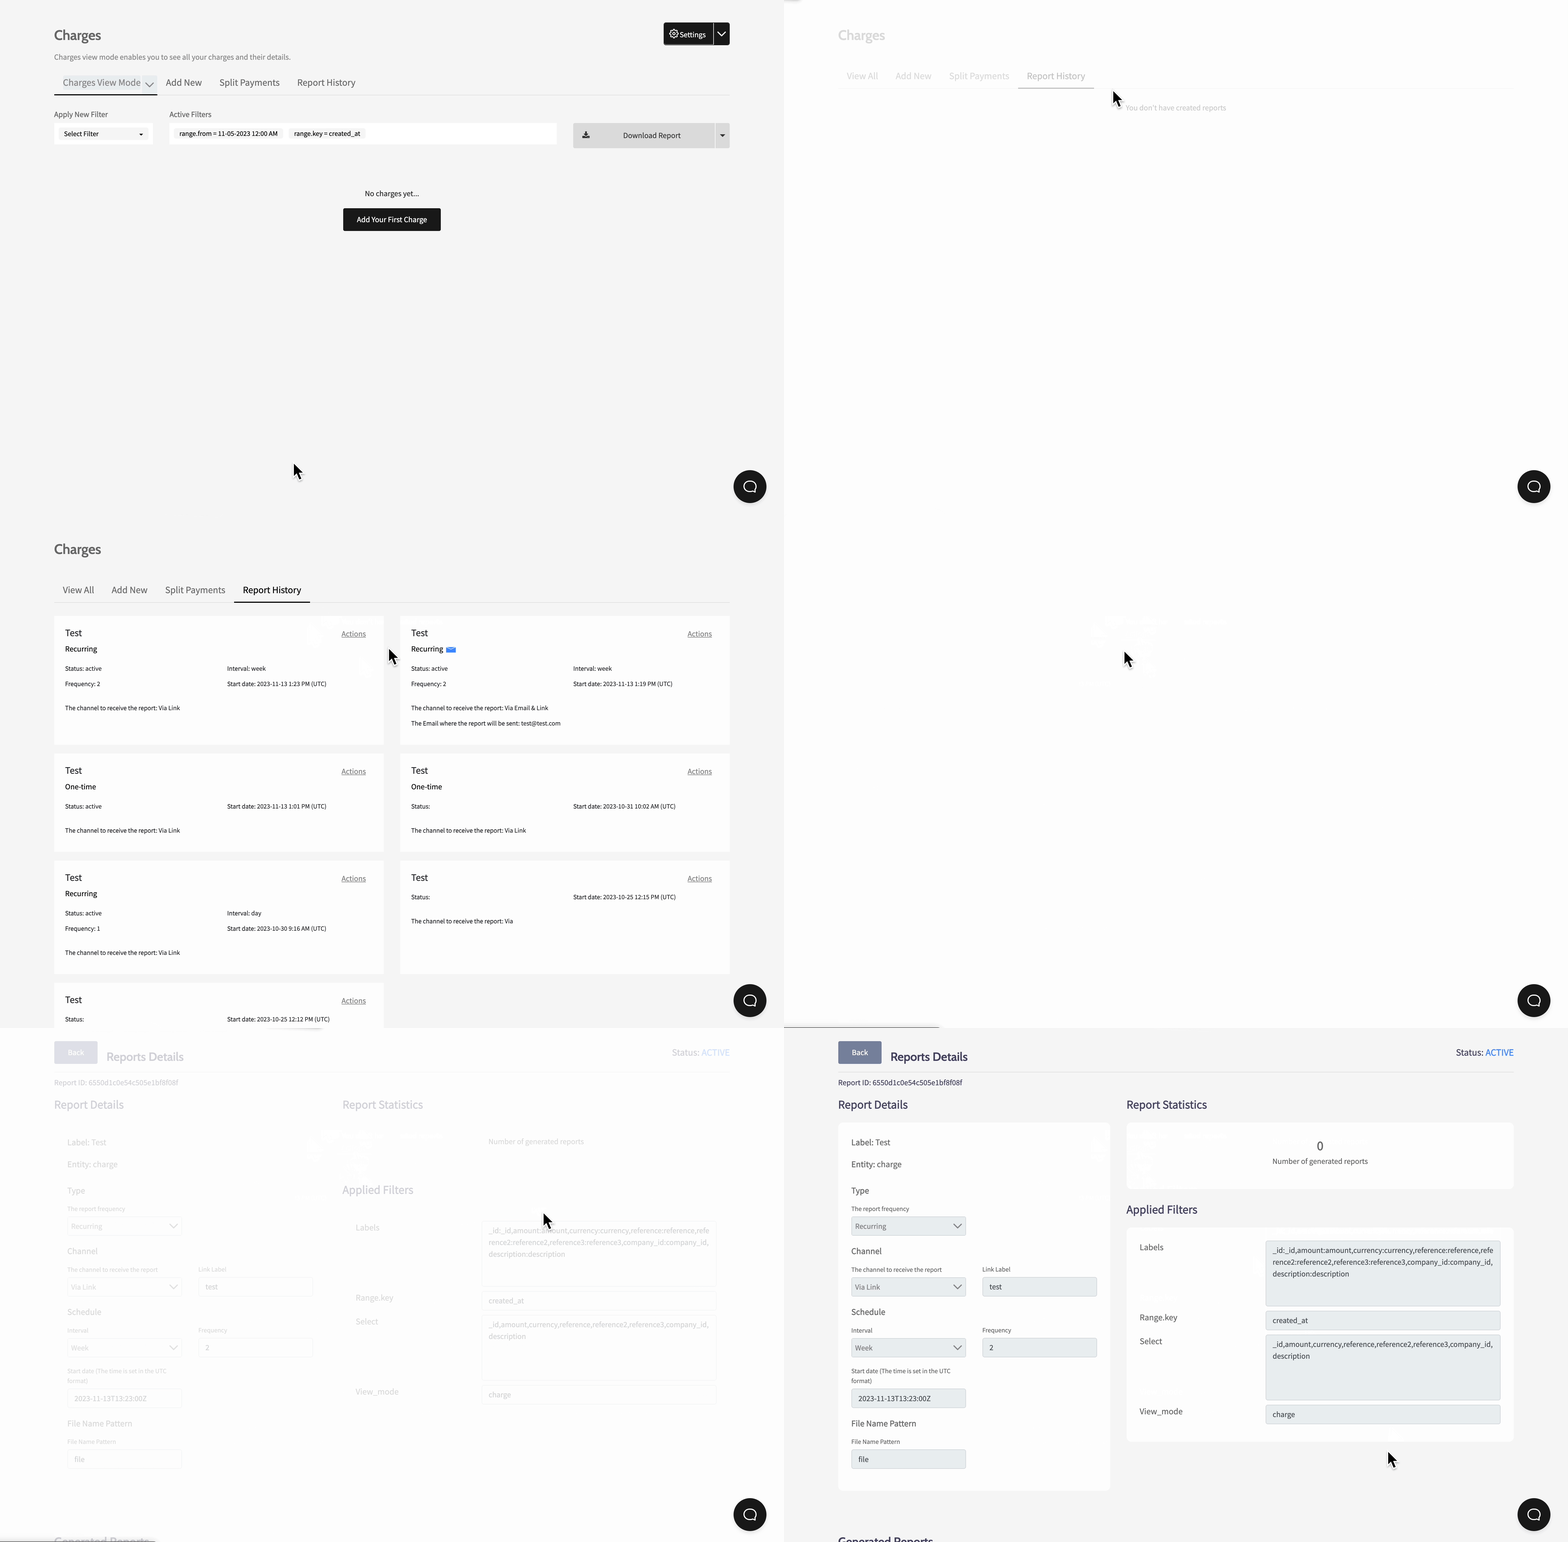
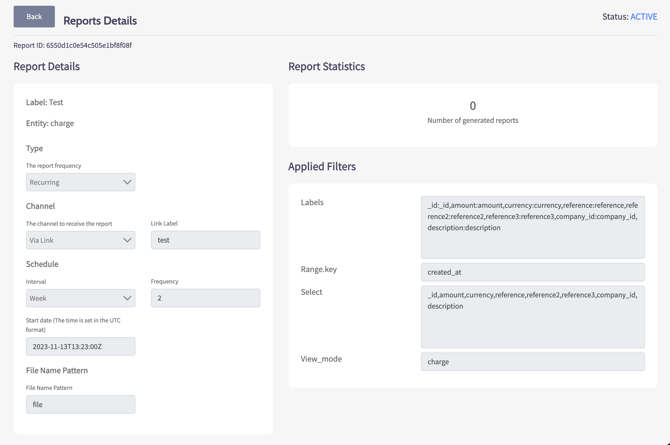
Here are the Report's Details:
- Report ID - the requested report's ID.
- Status - the requested report's status (Completed, Active, Cancelled Manually).
- Report Details - the requested report's settings.
- Report Statistics - the number of generated reports.
- Applied Filters - the requested report's filters (Archived, Labels, Select, VIew_mode).
To view the access logs of the generated reports:
- Generated Reports > Actions > Access Logs for the specified report. You can use the filter option or browse the list.
Here are the Access Logs' details:
- Type - the type of access (Endpoint response, File server).
- Initiatory User Details - the report requestor's details (User ID, Email, Full Name).
- Link expires at - the report link's expiration time and date in UTC.
- Link created at - the report link's creation time and date in UTC.
Download Reports from Charges
To download relevant Transaction data in CSV format:
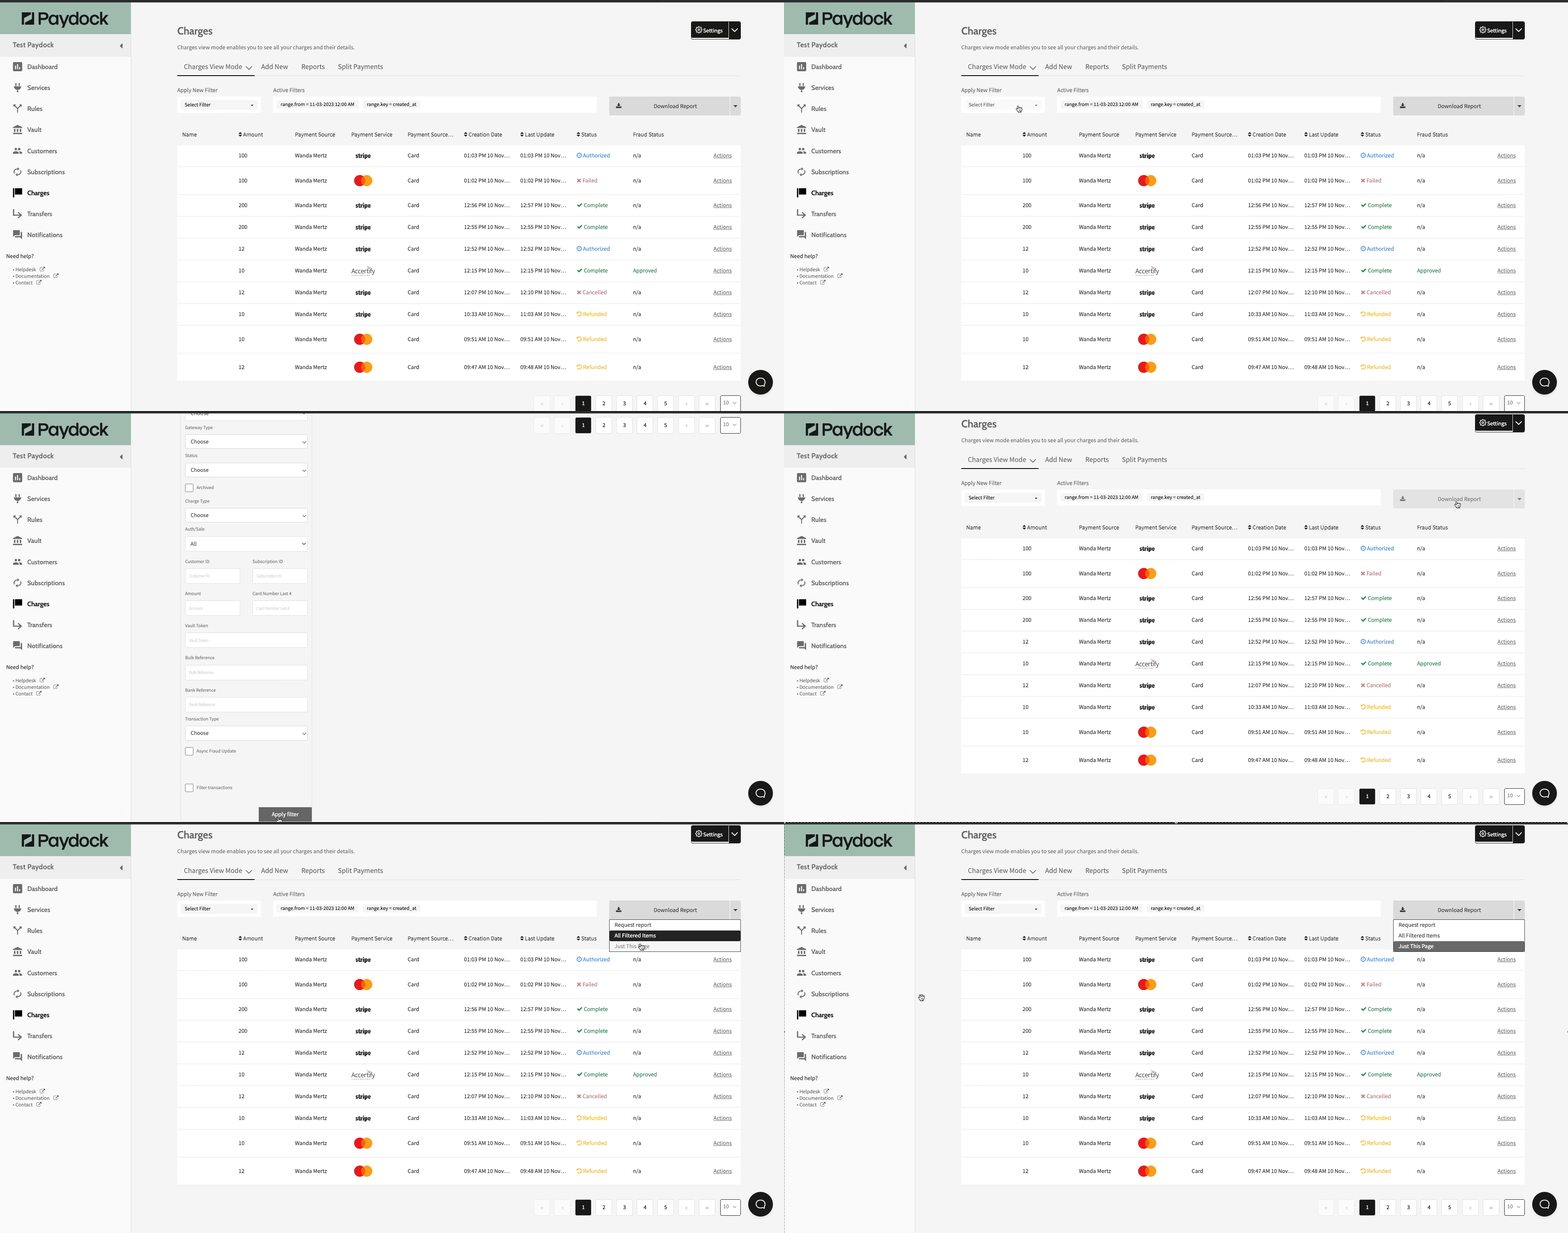
- Go to Charges > View Mode > Download Report > All Filtered Items or Just This Page.
Download either a single page with 10, 25, 50 or 100 rows or all filtered items based on one or more of the criteria below:
- First and Last Name
- Email, Reference
- External ID
- Charge ID
- Date range
- Payment Service
- Vault Token
- Transaction Type
- Status
- Amount
- Last 4 digits of the card
- Customer ID
- Subscription ID
Note: For reconciliation discrepancy, Paydock uses ISO 4217 standards to truncate transactions in all currencies to 2 digits after the decimal, without any rounding, e.g.30.895 is truncated by us to 30.89.
Download Customer Reports
To download relevant Transaction data in a CSV format:
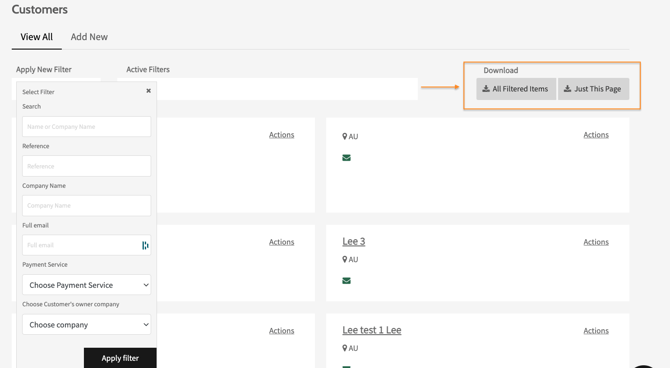
- Go to Customers > History > click on All Filtered Items or Just This Page.
Download either a single page with 10, 25, 50 or 100 rows or all filtered items based on one or more of the criteria below (including a full match of the filtered information):
- Name
- Full email
- Reference
- Company Name
- Payment Service
Note: Reconciliation discrepancy Paydock uses ISO 4217 standards to truncate transactions in all currencies to 2 digits after the decimal, without any rounding, e.g.30.895 is truncated by us to 30.89.
Download Subscriptions Reports
To download relevant Transaction data in CSV format:
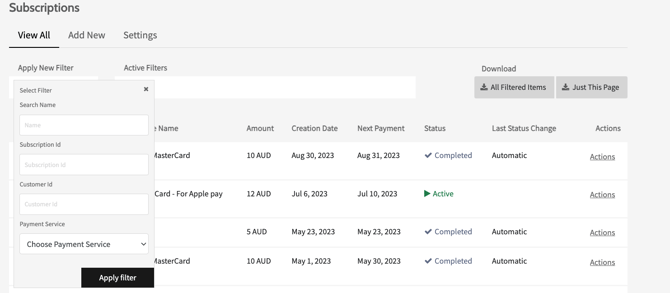
- Go to Subscription> View All > click on All Filtered Items or Just This Page.
Download either a single page with 10, 25, 50 or 100 rows or all filtered items, based on one or more of the criteria below:
- Customer Name
- Subscription ID
- Customer ID
- Payment Service
Note: For Reconciliation discrepancy, Paydock uses ISO 4217 standards to truncate transactions in all currencies to 2 digits after the decimal, without any rounding, e.g.30.895 is truncated by us to 30.89.
Download Notifications Reports
To download relevant Transaction data in a CSV format:
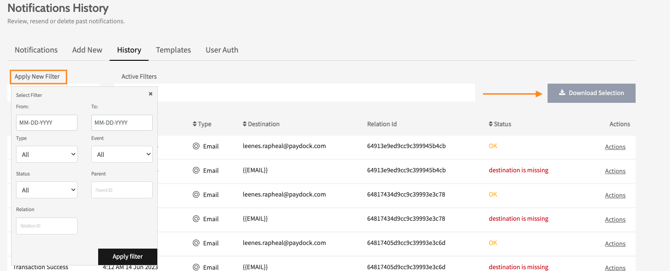
1. Go to Notifications > History > Download Selection.
Download either a single page with 10, 25, 50 or 100 rows or all filtered items based on one or more of the criteria below:
- Date Range
- Event
- Type
- Status
- Parent ID
- Relation ID (e.g. Subscription ID, Charge ID or Transaction ID)
Download Vault Reports
To download relevant Transaction data in a CSV format:
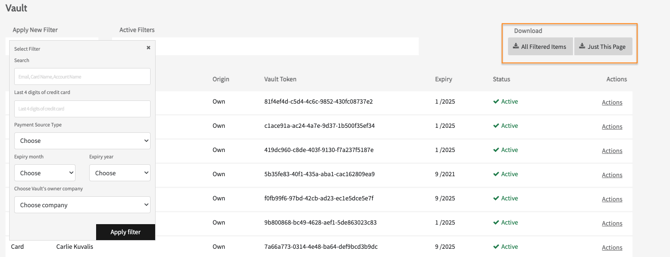
- Go to Vault > All Filtered Items or Just This Page.
Download either a single page with 10, 25, 50 or 100 rows or all filtered items based on one or more of the criteria below:
- Card Name
- Account Name
- Last 4 digits of the credit card
- Payment Source Type
- Expiry month and year
Download Transfers Reports
To download relevant Transaction data in CSV format:
- Go to Transfers > Transfers > click on All Filtered Items or Just This Page.
Download a single page with 10, 25, 50 or 100 rows or all filtered items based on the criteria Description.

Note: If the Download buttons are not working, allow pop-ups for Paydock's URL (https://app-sandbox.paydock.com/ or https://app.paydock.com/ ) in the browser.
Reporting Encryption
Reporting Encryption feature enables Merchants to use PGP keys for encrypting report files which are generated by the Paydock reporting engine and delivered via various channels, namely, SFTP, email, and link.
As an encryption algorithm, PGP has been chosen as a standard for email security. Pretty Good Privacy (PGP) is an encryption system for sending encrypted emails and encrypting sensitive files.
PGP uses both symmetric encryption and public-key encryption, it allows users who have never met to send encrypted messages to each other without exchanging private encryption keys.
How to set up a PGP key:
- Generate your PGP public and private keys.
- Go to Paydock Dashboard → Services → Add New page
- Select Encryption Services from the Service Group dropdown.
- Click Activate next to the PGP service.
- Fill in the following details:
- Label - a custom name for your PGP service
- Public key - the generated public key
- Go to Charges and proceed with the report setup as described here.
- Click Download Report > Request report from the drop-down menu.
- Fill in the report settings and for
- Processing Type - choose Encrypted from the dropdown
- and the Encryption service label from the new dropdown.
- Press Confirm.
- Receive an encrypted report file to the chosen destination and download it.
- Decrypt the report using your private key.
Generate & Deactivate Link Charge Reports
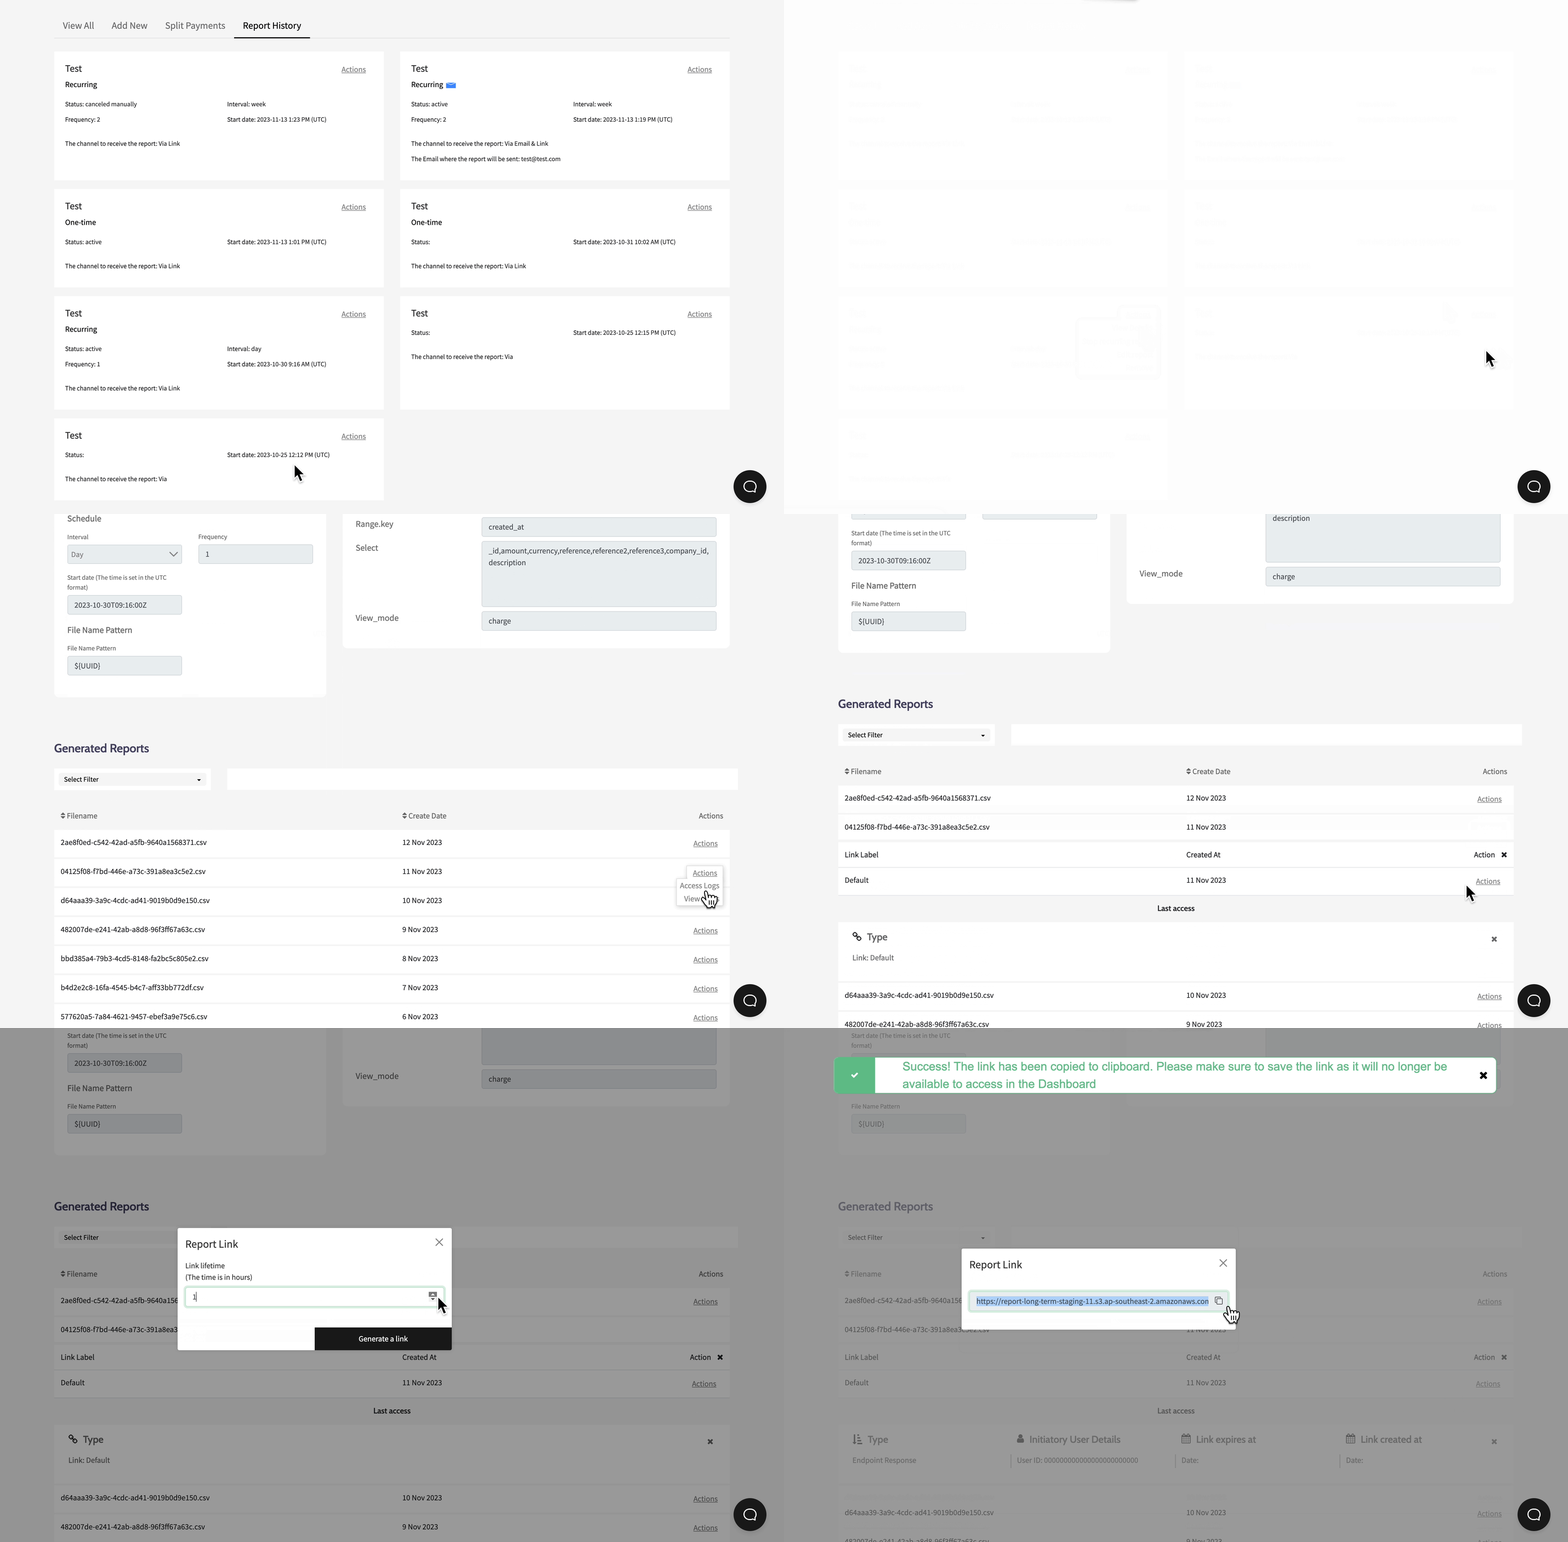
To generate a report link:
- Go to Charges > Reports > Generated Reports > Actions > Copy link to report for the specified report. You can use the filter option or browse the list.
- Insert the hours for the link's lifetime.
- Click Generate a link.
- Copy and share the link, as it will not be available in the dashboard afterwards.
To temporarily deactivate the report's generated link:
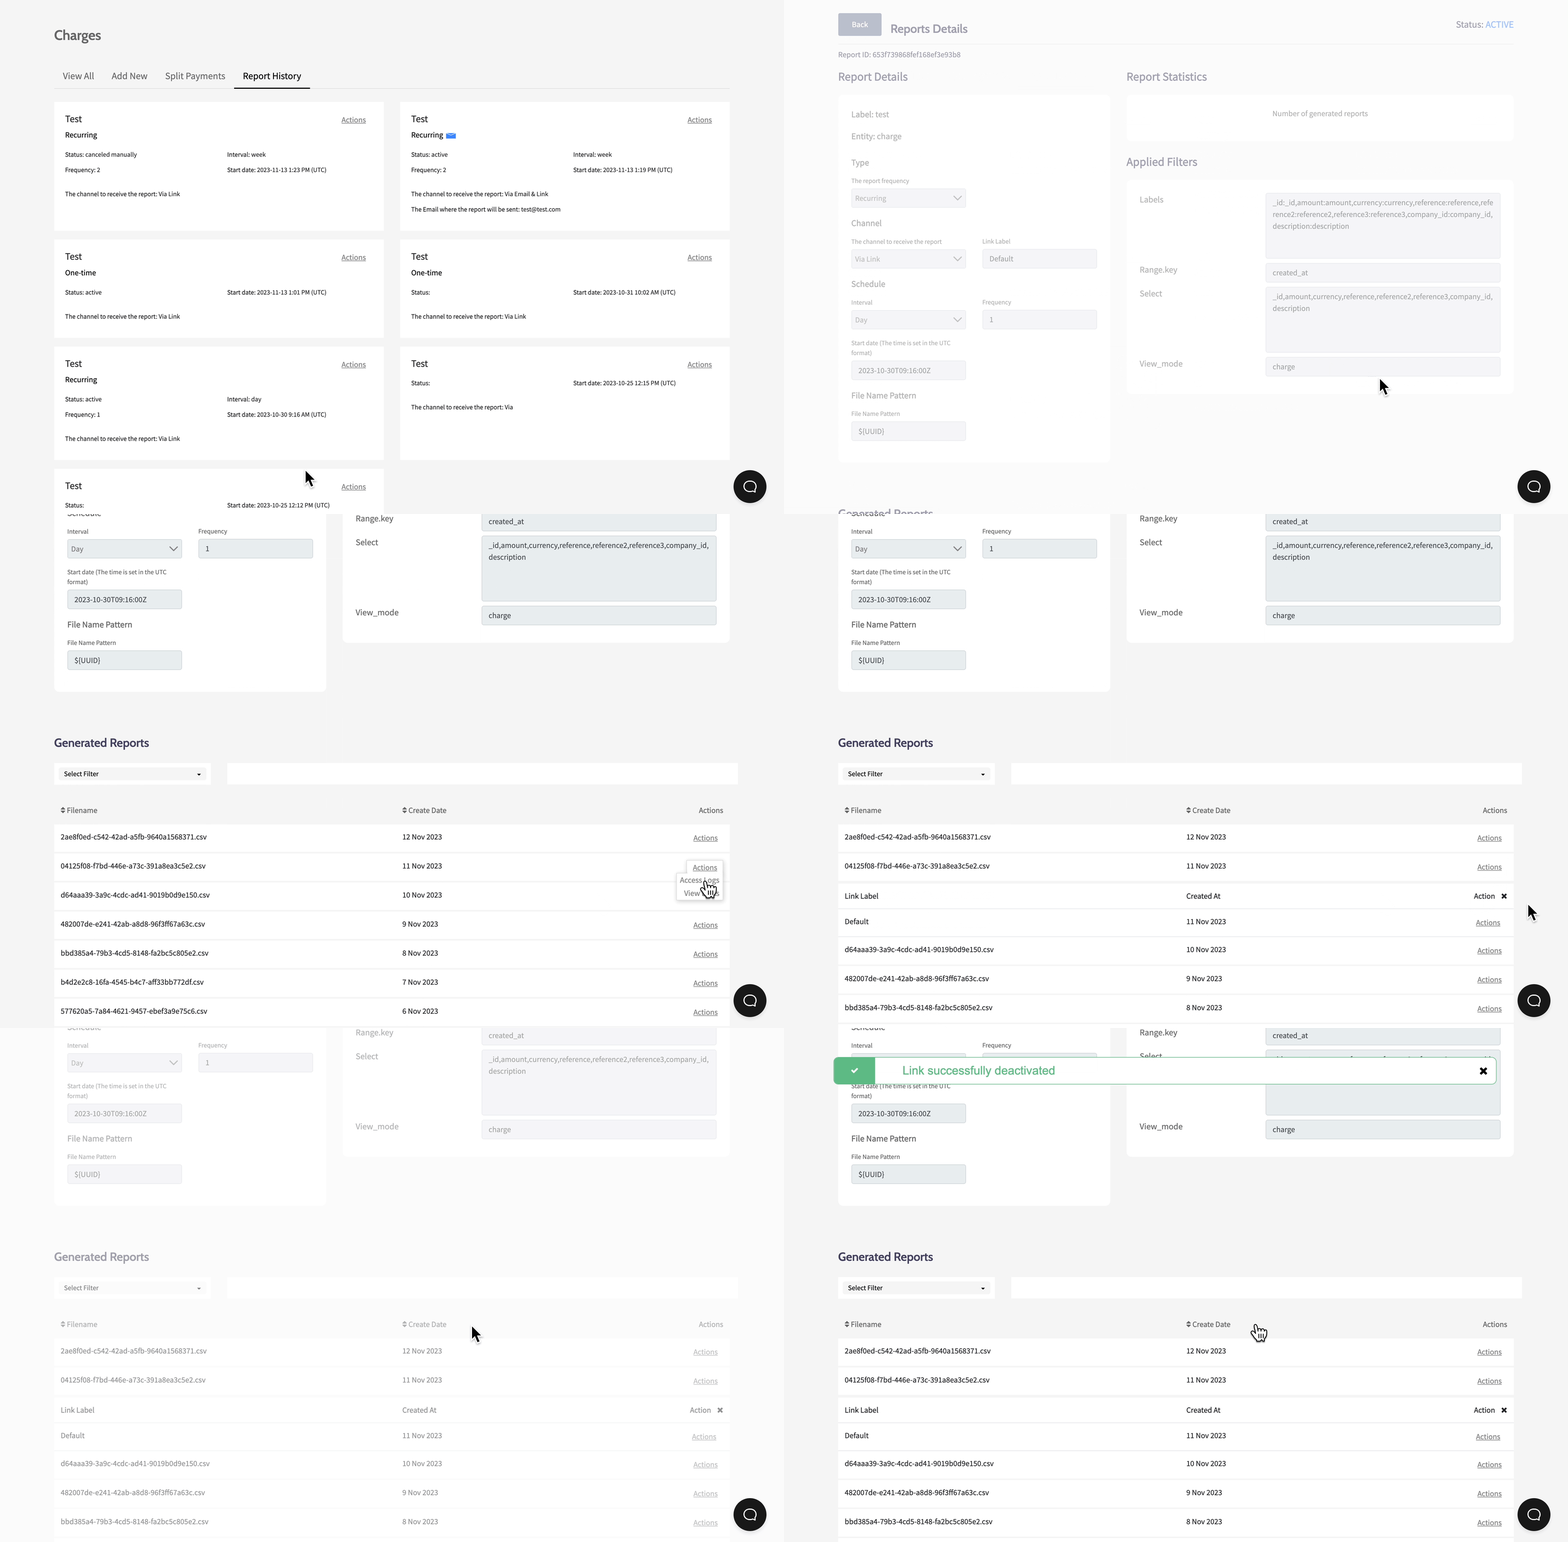
- Go to Charges > Reports > Generated Reports > Actions > Deactivate link for the specified report. You can use the filter option or browse the list.
- Press Confirm.
Generate & Deactivate Link Charge Reports
To generate a report link:
- Go to Charges > Reports > Generated Reports > Actions > Copy link to report for the specified report. You can use the filter option or browse the list.
- Insert the hours for the link's lifetime.
- Click Generate a link.
- Copy and share the link, as it will not be available in the dashboard afterwards.

To temporarily deactivate the report's generated link:
- Go to Charges > Reports > Generated Reports > Actions > Deactivate link for the specified report. You can use the filter option or browse the list.
- Press Confirm.

