Managing Company accounts as a Master Merchant
How to Add, Update, Activate, Deactivate and Remove company accounts as a Master Merchant user
Add new Company
Company / Merchants are people or businesses that sell goods or services to customers and other businesses. As a Brand, you can create multiple Company accounts and monitor, control and review their activity from the dashboard. Log in as a Company for a more granular view of their payment behaviour. Activate or deactivate subsidiaries with one click.
To create a new Company:
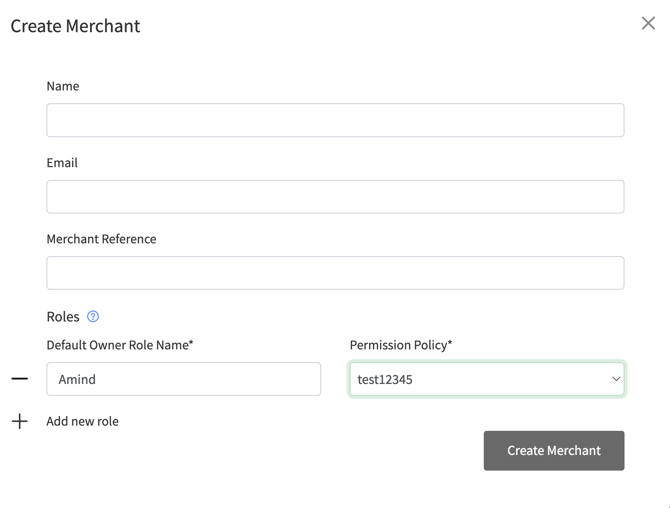
- Go to Merchants > Create New.
- Fill in the Name, Email, and Merchant Reference.
- Add the Roles for this particular Merchant and select Permission Policies for them. (If the roles has not been selected for Default Owner role, the Admin role will be created automatically and assigned to the user)
- Click Create Merchant.

Please note: The Merchant Reference field can be filled out in alphanumeric format with up to 64 characters long. The field is optional by default, therefore it is still possible to create a Company without Merchant reference.
The creation of a Company is also possible through the API request where the merchant_reference field can be added to the request body:
curl --location -g --request POST '/v1/scope/brand/companies' \

--header 'x-access-token: ' \

--header 'Content-Type: application/json' \

--data-raw '{

"email": "wanda-mertz.mertz@example.com",

"name": "Wanda company",

"merchant_reference ":  "string "

}'
Activate Company
To activate a Company:
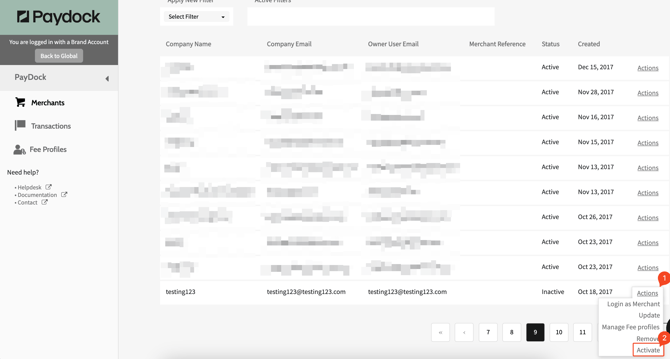
- Go to Merchants > Actions > Activate for the specified Company. You can use the filter option or browse the list.
- Confirm with Activate.

Update Company
To update the details of a Company:
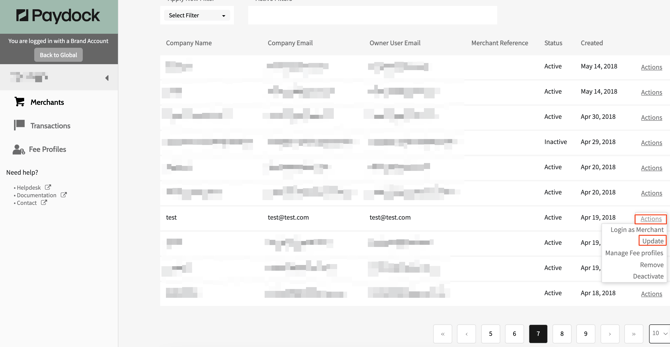
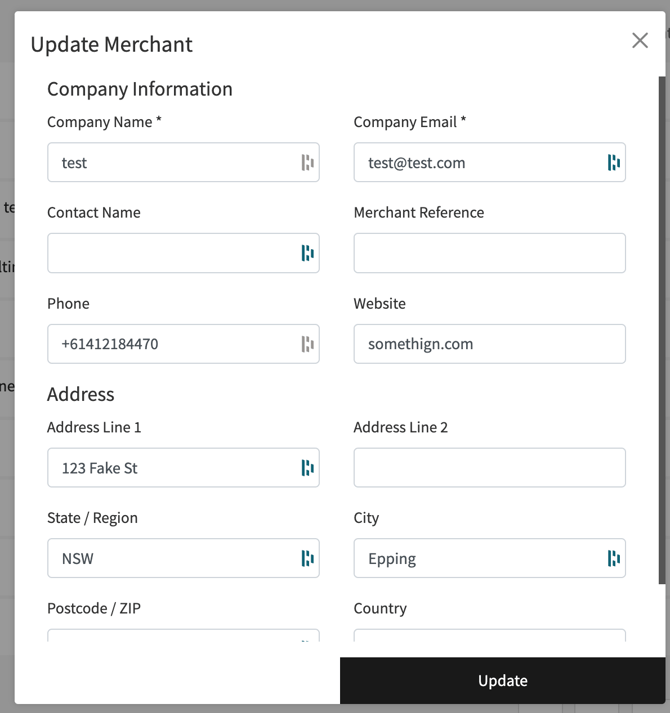
- Go to Merchants > Actions > Update for the specified Company. You can use the filter option or browse the list.
- Update fields under the Company Information.
- Confirm with Update.


Deactivate Company
To deactivate a Company:
- Go to Merchants > Actions > Deactivate for the specified Company. You can use the filter option or browse the list.
- Confirm with Deactivate.
Note: A deactivated Company can still process refunds via the portal for a certain period of time. To manage permissions through Roles, go here.


Please note: Once your Company is deactivated, you need to ensure that all the Company related items are canceled as well to avoid any unexpected charges and storing irrelevant data. To do so it is required to:
-
Cancel any active subscription (This is to avoid any ongoing charges after closing the merchant)
Log in as Brand and go to the list of Merchants, click on the Actions by the required Merchant > Login as Merchant > Subscriptions > click on the Actions by the required subscription > Cancel.
-
Remove any vault token (This is to avoid storing data not relevant after the closure)
Log in as Brand and go to the list of Merchants, click on the Actions by the required Merchant > Login as Merchant > Vault > click on the Actions by the required vault > Remove.
-
Remove any customer (This is to avoid storing data not relevant after the closure)
Log in as Brand and go to the list of Merchants, click on the Actions by the required Merchant > Login as Merchant > Customers > click on the Actions by the required customer > Remove.
- Confirm that there are no transactions for the last few days (to avoid charges, refunds, cancellations, etc…). It is required to check the following:
- Pending authorized charges
-
Requested for bank account charges
Log in as Brand and go to the list of Merchants, click on the Actions by the required Merchant > Login as Merchant > Charges > potentially use filters or download a report and based on the review of the report > filter all charges with "Complete", "Failed", "Archived", "Canceled" status > review the remaining charges and if required, complete them or decline (Actions > Cancel/Capture)
-
Requested, Partially Approved, and Partially Declined for Transfers
Log in as Brand and go to the list of Merchants, click on the Actions by the required Merchant > Login as Merchant > Transfers > click on the Actions by the required transfer > Delete (Or Process if the pending transfer is required to be processed). You can use the filter option or browse the list.
-
Deactivate Gateways and Services (This is to avoid any ongoing charges after closing the merchant)
Log in as Brand and go to the list of Merchants, click on the Actions by the required Merchant > Login as Merchant > Services > click Actions by the required service > Remove.
-
Turn off Auto-void for MPGS/EFTPOS (This is to avoid any ongoing charges after closing the merchant)
Log in as Brand and go to the list of Merchants, click on the Actions by the required Merchant > Login as Merchant > Services > click Actions by the active MPGS service > Edit > find “Automatic Void” and untick the check-box > click the Edit details.
-
Stop recurring reports (This is to avoid any ongoing activities after closing the merchant)
Log in as Brand and go to the list of Merchants, click on the Actions by the required Merchant > Login as Merchant > Charges > Reports > click on Actions by the required report > Stop recurring report > Confirm.
-
Pause API Secret Key and API Public Key (This is to ensure merchants cannot use the backend features)
Log in as Brand and go to the list of Merchants, click on the Actions by the required Merchant > Login as Merchant > My Company > API & Settings. To revoke and issue new API keys, select Reset underneath each Key.
-
Deactivate Access Tokens (This is to ensure that access tokens won’t be used by merchants)
Log in as Brand and go to the list of Merchants, click on the Actions by the required Merchant > Login as Merchant > My Company > lick on Actions by the required access token > Deactivate > Deactivate Permanently (no expiry date). Click on Deactivate under Recent Authentications to deactivate the specific login.


